Holiday Sneak Peak: 2 Ways to Use the Holiday Floral
/I know for some it maybe too early for Holiday Cards, but I love making them all year long. I also tend to make a card design once so I need a whole year to make enough cards to send to friends and family around the Holidays. Here are a couple of ideas for the upcoming ‘Holiday Floral Stamp set and Floral Die set‘ that are releasing next Saturday, September 10th. I have a sneaking suspicion this may become one of my favourite items of the new Halloween/Christmas release. I paired these cards with the ‘Large Word Christmas Die’ set, which will also be apart of the same release. If you looking for some additional ideas on how to use this set, stay tuned, next week I will also share a different method for using this stamp set and dies.

The Holiday Floral is a layering stamp set that creates a gorgeous floral Christmas tree. Beauty of this Holiday Floral set and Holiday Floral dies is there are many ways they can be combined for different looks. They also work nicely on their own.
Get the look:
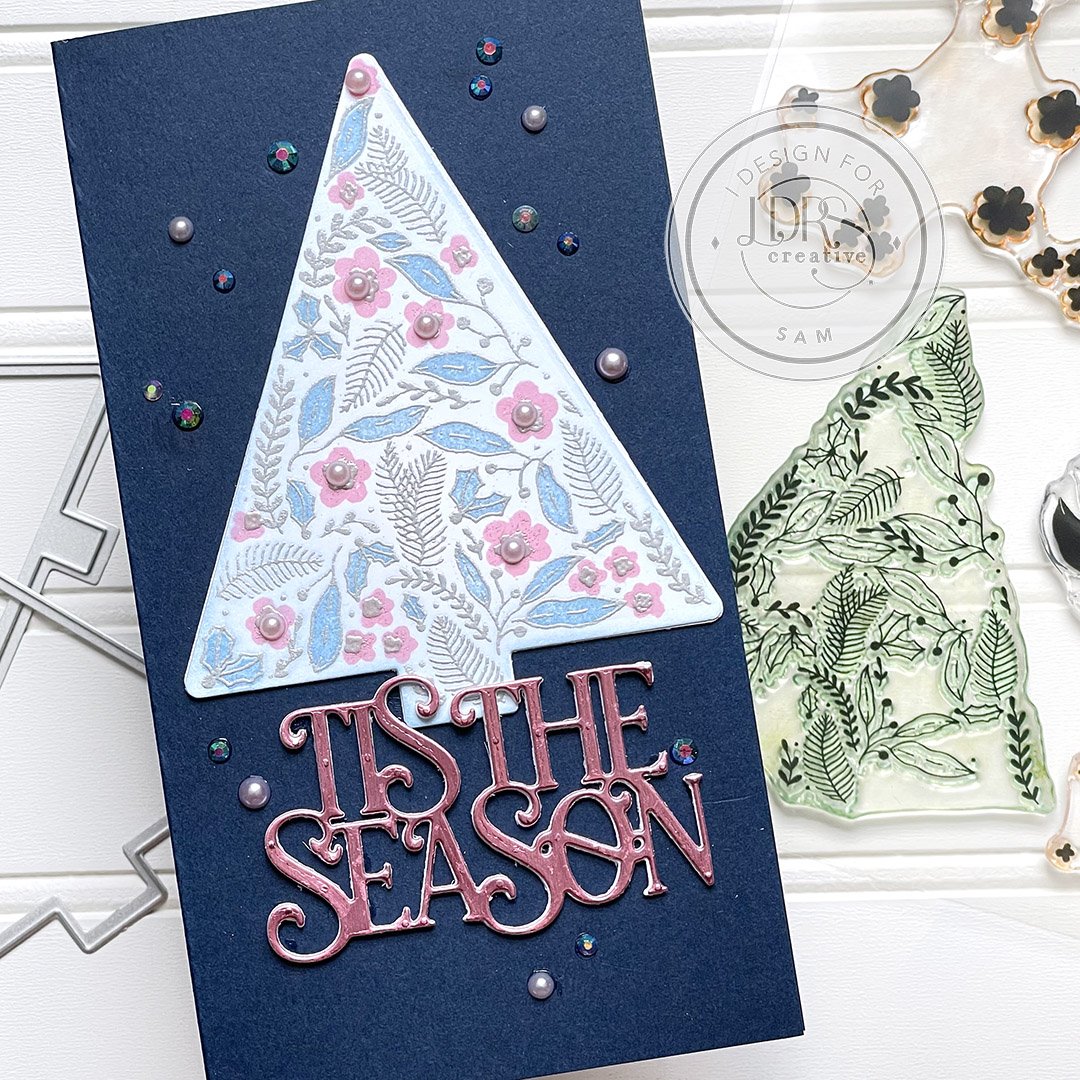
For the first card I stamped the tree the way it was originally intended. The initial outline layer I stamped and heat embossed in silver. The 2nd solid leaf layer I stamped with Swimming Hole ink which is a lovely versatile light blue. The large floral layer I stamped with Pink Tutu ink and the final smaller flower layer I choose to stamp and heat emboss in silver again. I then choose to die cut the tree and lightly add Swimming Hole ink around the edge so it had a softer look than a white background. I die cut ‘Tis the Season’ from ‘Large Word Christmas Die’ set out of pink foil and chose to back the sentiment with 3 additional die cut pieces of scrap white card stock for strength and dimension. I adhered the tree and the sentiment to a navy blue mini slim card base of 3 1/2”x 6 1/2”. Lastly I decorated the card and tree with crystals and tiny pink pearls.

Get the look:

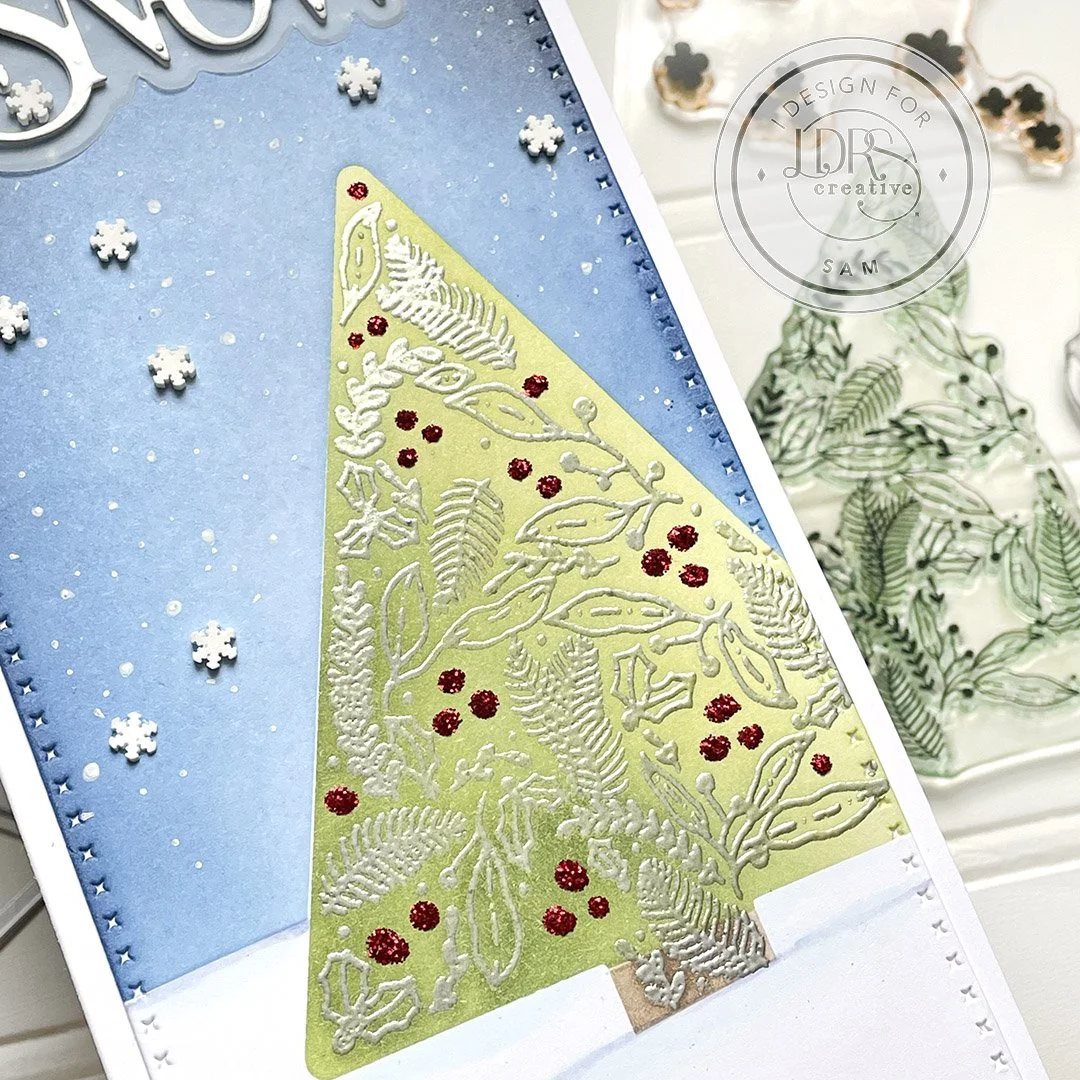
The second card involves some very easy masking using the Holiday Floral Die, the base layer of the Holiday Floral Stamp set and some ink blending.
I started by die cutting out the tree shape and also free hand cut 2 snow hills from masking paper.
I also die cut the background panel using the slim line panel from Floral Foliage die set.
Place the snow hill masks and the negative portion of the tree mask on the slim line panel. Stamp and heat emboss the outline layer of the Holiday Floral Stamp set in silver.
Ink blend Evergreen and Key Lime Pie ink over the tree mask. For the trunk I just free handed a little Coffee Bean over the base.
Remove the negative portion and apply the positive mask of the tree to cover up the ink blended tree. Keep the snow hill masks in place.
Blend Swimming Hole, Dark Wash Jeans and Raven over the background to create the winter sky.
Remove all of the masks. Add a snowy sky with your favourite white gel pen. I also add some cute little snowflakes I had in my stash.
Instead of adding the additional stamp layers to this tree I choose to use Stickles red glitter to create clusters of berries on the tree.
I die cut ‘Let it Snow’ from ‘Large Word Christmas Die’ set out of matte silver foil and chose to back the sentiment with 3 additional die cut pieces of scrap white card stock for strength and dimension. I then layered it on it’s outline die cut out of vellum and adhered to the background.
Lastly attach the panel to a slime line card base.
Hope I’ve given you a few ideas to get you started using the Holiday Floral Stamp and Holiday Die set that arrives in the LDRS Creative online shop next Saturday, September 10th. Happy papercrafting : )
