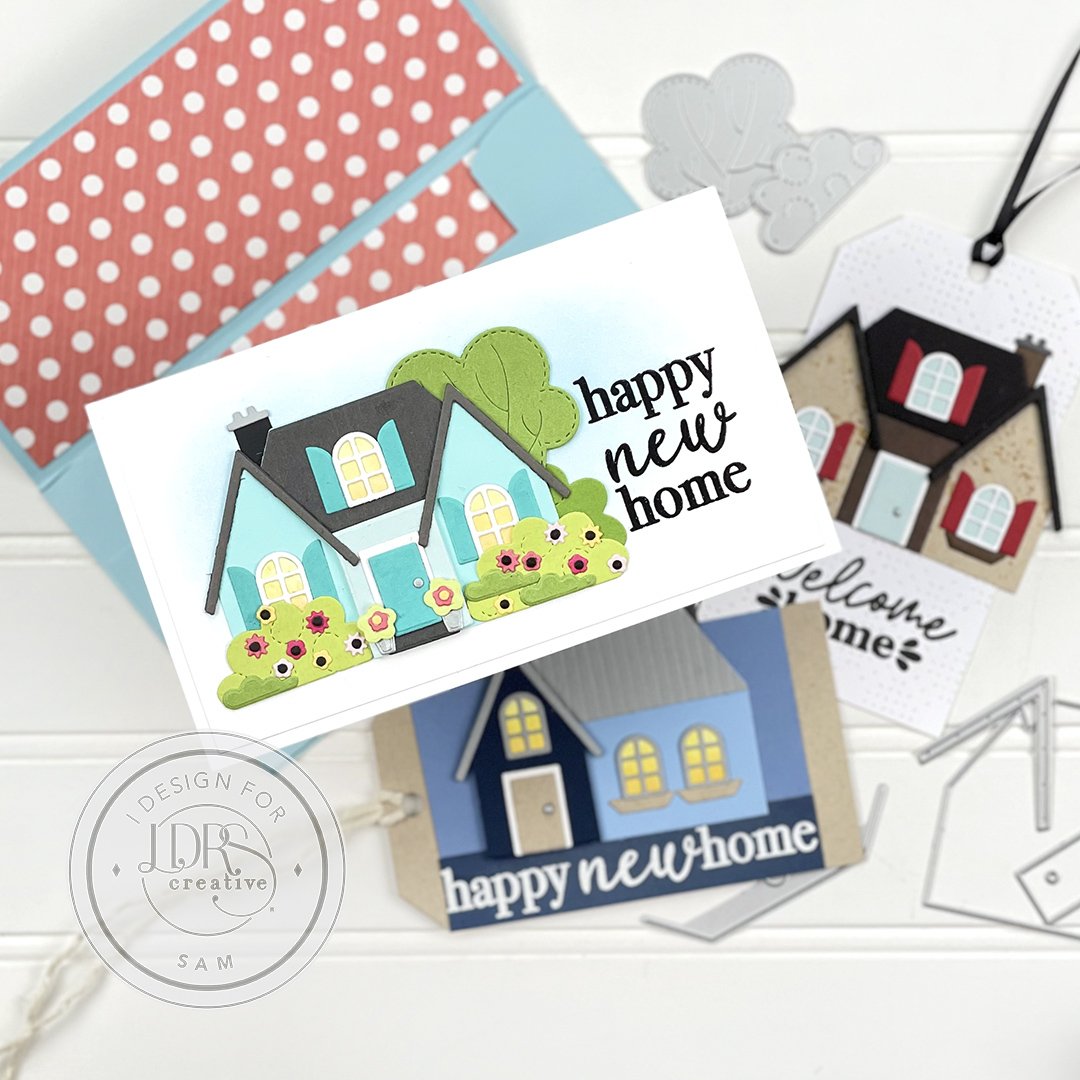
Ways to Step-Up Die Cut Elements. Using Home Design Dies
/The New LDRS Spring Collection has the most wonderful die set to create adorable little houses that are the perfect size for gift tags for a house warming gift or a card to celebrate a new home. Today I have used the Home Design Dies and the Foliage Add-Ons, along with the Home Sentiment Stamp Set to create a collection of gift tags and card. There is barely any need to provide instructions to create these tags/card, but I’ve added lots of tips on ways to step-up your little house and add texture. But really it is all about die cutting the elements and having fun building your little house.

Since the Home Design Dies and the Foliage Add-Ons is full of smallish dies this project is ideal to dig around and use up your left over scrap card stock. TIP: I keep a bin on my desk that is full of all the colourful little leftover pieces from past projects. I am one of those people that out of sight means out of mind, so keeping the bin on my work surface means I will actually remember to use the scraps.
So before I even start planning how I’d like to layout the card/tags, I begin by die cutting all of the elements and separating components into little dishes. A muffin tin works well as for sorting.
Then basically it is a matter of playing around and having fun, pulling the little houses together.

Get the look:
Create a mini slimline card base that is 6” x 3 1/2”
Lightly ink blend Bali Blue onto the background.
Have fun arranging all of the House and Foliage elements onto the card. TIP: Layering your dies with foliage in behind and in front creates depth.
Stamp sentiment from Home Sentiment Stamp Set
TIP: For additional texture on the roof a simple technique is to use score board to create vertical lines.


Get the look:
Create a tag using the new Any Size Tags die set out of Kraft card stock. NOTE: The traditional angled tag topper is perfect size for the houses, however there are 2 other great options in the die set.
Stamp and emboss sentiment from Home Sentiment Stamp Set on a matching colour cardstock to your house. TIP: I masked and stamped the sentiment horizontally.
Have fun building your house.
If you notice that for this house I played around with the roof element to change up the style of the house. It is very simple to make the change. Simply partially die cut the roof element with the edge of the triangular peek being the end cut, then leave the other end open. When you glue the roof to the body cut the roof angled down to the straight edge of the building.
TIP: Especially since I did not include any windows on the roof, I again added texture by using score board to create vertical lines.
Get the look:

Again create a tag using the new Any Size Tags die set out of white card stock. This open ended tag die is such a great option to be able to control how long you want the tag.
Run tag thru die cutting machine with Quilted Plaid Coverplate Die. Steps up a simple background. TIP: I like to die cut shape first before using anything to add texture. Find you keep the texture better this way.
Stamp sentiment from Home Sentiment Stamp Set tag.
Have fun building your house.
TIP: To step up texture and interest on the body of this house I wanted to create a mottled effect by adding a patterned background stamp. I stamped the Natural Granite Background stamp on scrap of Kraft card stock to get the mottled effect.
Bonus:
Since I made a mini slim line card. Thought I would create a matching envelop with the new Mini Slimline Envelop Die. Love that there is an option to either create a vertical or horizontal opening envelop.

Hope you enjoyed the tags/card today and have discover several ways you can step-up the texture on these little houses, simply by combining them with other items in your stash. Happy papercrafting : )
